Thursday, July 26, 2012

Progress!

I've made some good progress on this quilt. I replaced the four without much trouble, although it took quite a bit of time to rip out since I used tiny stitches for the foundation piecing. I'm just so glad the top is pieced together and the end is in sight!

anny quilt top

Of course there's another border to add. And a backing to piece together... the quilting... the binding. Quiltmaking can really feel like a never-ending process sometimes, huh?

But I vow not to work on another project until this one is done. I hope to be able to quilt it this weekend (but I think I've said that the last 3 weekends!).

Thursday, July 12, 2012

That Pesky Four

40 block

Although I haven't posted about it for a while, I'm still chugging along on this quilt. Now that I've gone back to see when I posted those first blocks, I realize I've really been dragging my feet on this quilt! The event it's meant to celebrate was a few weeks ago, but I won't see the recipients for another week and a half so that's my justification! I'll give details about the recipients and what all these seemingly random blocks are about when it's finished.

40 close-up

Obviously, since I first started working on this quilt back in May, it's been up on my design wall for quite a while. I finished this 40 block and noticed at the time that the ascender of the 4 didn't match up quite right, but I told myself to move on and no one would ever notice the bad match except for me. Fast forward a few weeks and that 4 had become my nemesis. Every time I added a new element to the design wall, I could see the 4 mocking me. But I was worried that I wouldn't be able to extricate the four without messing up the entire block and having to start all over. I finally asked for advice from the ladies in my quilt group-- should I let it go, or try to fix it? It was kind of a split decision but, in my mind, the people who spoke loudest to me were the ones who said I should fix it because it would forever drive me crazy. I figure they were the loudest to me, because that's what I really wanted to do. I just needed to hear someone else say it. :)

4 take 2

So here's the new 4 with much better matching seams. Now comes the hard part of taking out the old 4 and putting in the new. I'm a little nervous....

more anny blocks

And here are the last of the paper pieced blocks I needed to make. These will be part of the border. I'm hoping to finish up the top this weekend, and then quilt next week!

Tuesday, July 10, 2012

Birdie Sling

birdie sling 1

I did it! I finished another bag in time for Purse Palooza! It's the Birdie Sling by Amy Butler; a pattern that's been sitting on my shelf for ages. Size-wise, this bag couldn't be any more different from the bag I made a couple weeks ago. This baby is substantial. It could eat 3 of those clutches for lunch and still have room for dessert.

birdie sling 2

It's rough to get sewing projects done in the summer. So much of my time is spent outside and keeping little people entertained (which is a good thing! most of the time...). It felt like it took me days just to fuse all the interfacing to the various pieces of this bag. There's a lot of structure to this bag and it doesn't make it the easiest thing to maneuver under the needle. After I was done with the final seam attaching the lining and exterior I felt like I had just wrestled a badger. I've never bent up so many pins— in trying to pin the many layers of fabric and interfacing together AND in running over them with the machine. That was a combination of being too lazy to take them out as I came to them and also not having a hand free as I tried to wrangle the beast.

But for all this whining, I am quite happy with the results. All that interfacing may be a pain, but it gives the bag good bones and makes it look more professional. And who doesn't love a good chevron print these days? I saw this home dec print in Hobby Lobby and passed it up the first time because I didn't have a use for it at the time. Then I decided to make this Birdie Sling and had trouble finding it again. So glad I did! The contrasting band and handle fabric is from the Summer's End collection by Hoffman.

birdie sling 3

The directions called for two pockets. I used the pattern for the smaller pocket, but made an even shallower pocket on the other side so it would fit my cell phone better. This bag will carry all my "essentials" and then some!

birdie sling 4


Sew Sweetness

Sunday, July 8, 2012

Experimenting with Bleach

I've seen a few fun uses of bleach on t-shirts lately and just had to try them out for myself. The first technique I read about on MADE. When I saw it I immediately thought of this shirt.

tshirt before

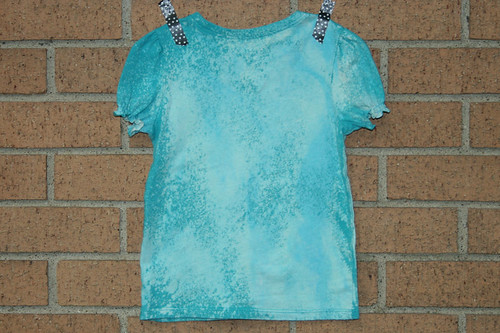
Its one of K's shirts that I accidentally bleached after she had only worn it a couple times. She came home from daycare with a mystery stain on the shirt. When this happens I spray it with OxiClean and wash it whenever I get around to it. Well this time leaving the OxiClean on it for a couple days left bleach spots. I was bummed! So it's been sitting in her drawer for a few months because I've been mad at myself for having ruined an almost-new shirt.

tshirt front

I think I got a little heavy-handed with the spray bottle. I wish it had turned out a little more mottled. I like the results on the back better.

tshirt back

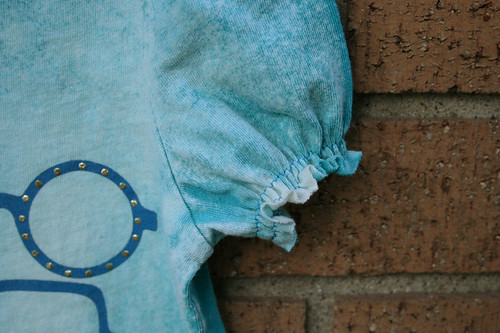
And shirring strikes again! Since I didn't think she would fit in this shirt when long-sleeve weather comes back, I decided to give the sleeves a trim. Rather than try to hem the sleeves, I stitched two lines of elastic thread to give the shirt a cute puffed sleeve.

tshirt sleeve

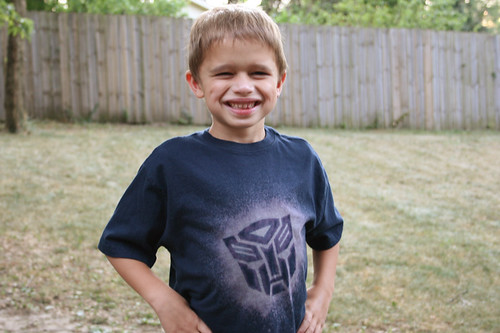
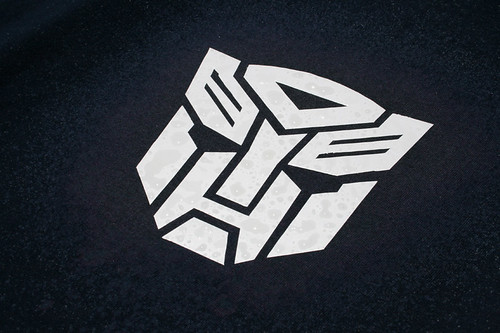
Bleach experiment #2 came from this post via craftgawker. Although I couldn't read it (it's in Danish), the photos were self-explanatory. I wanted to use something with simple lines and what's better for a 6 year old boy than Transformers?

I traced the design onto contact paper and cut it out with an exacto knife- definitely the most time-consuming part of the process. I peeled off the backing and stuck the contact paper to the shirt.

transformer tshirt 1

I put a cookie sheet inside the shirt to keep the bleach from reaching the back of the shirt. I'm glad that it's summer and I can do all this bleaching outside! This time I mixed the bleach with a little bit of water. Here's a photo after I sprayed the bleach- you can see the color just starting to change.

transformer tshirt 2

I sprayed it off with the hose after a few minutes and here it is drying on the bench. Shirts dry FAST in these 100 degree temps!

transformer tshirt 3

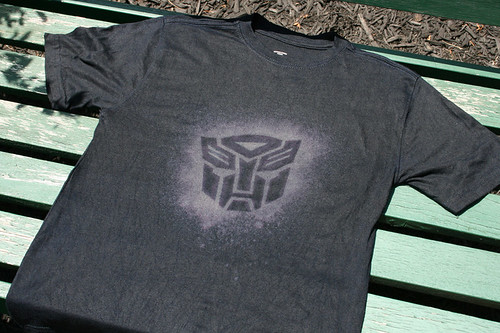
I'm pretty pleased with how it turned out! And so is the kid.

transformer tshirt 4

Sunday, July 1, 2012

Elegance Pleated Clutch

elegance clutch 1

This weekend I finished up the Elegance Pleated Clutch from Bags: The Modern Classics by Sue Kim. I love the patterns in this book! I think the bags are fantastic and her fabric choices are wonderful. I checked this book out twice from the library, which took a while because there was a reserve list a mile long. Neither time did I actually have time to sew anything from it, so I decided to treat myself and buy my own copy.

elegance clutch 5

The only problem I encountered with this project was my own stupid fault. The magnetic snap I first installed was ridiculously strong. Like I had to use a butter knife and pliers to get it apart STRONG. I bought these snaps several years ago when the Joann's in town went out of business, so they've been sitting around for quite awhile. Of course I had trouble getting them apart when I took them out of the packaging, but for some reason I thought they would be easier to get apart after they were in the fabric (better leverage?). Obviously, that was not the case. Maybe I need to revisit second grade science class and get a refresher course on how magnets work (i.e. they don't become less attracted to each other, just because they've been snapped into fabric!). Luckily I found a new set of magnetic snaps that fit in the same holes and I was good to go!

elegance clutch 3

The fabric is from the Parisville collection by Tula Pink. It's another one of those fabrics I've been hoarding for just the right project. I had thought about using another coordinating fabric for the outside flap or side panels, but loved this print so much I wanted to use it everywhere. The lining is another print from the collection. And the button is just something I had in my sewing box- love it when I can use what I already have and don't need to run out and buy something special!

elegance clutch 4

Sew Sweetness


And I managed to finish this in time to participate in Purse Palooza! How can you not want to make yourself a new bag with all this inspiration flying around the blogs?! I have one more pattern in mind I'd like to make before the Palooza ends, but that may be a pipe dream. With so many other things going on in the summer, it's hard to find time to sew. Wish me luck!